Get in touch
Want to get in touch? We’d love to hear from you. Here’s how you can reach us…

Want to get in touch? We’d love to hear from you. Here’s how you can reach us…
Monday-Friday, 9:30am – 4:30pm AEST
Our AI assistant is here 24/7 or send an email to us
You can also leave us a message on whatsapp
We accept the following methods of payment – Mastercard, Visa, Visa Debit, Afterpay and PayPal, Cash or Bank Transfer. In order to cover our costs of supporting these payment methods, we have to charge fees for these service. For credit card we charge 2% surcharge, paypal is 3% and Afterpay is 7%.
All orders are paid fully at checkout. You will receive order confirmation and invoices in your email. The shipment tracking will be sent by email as well.
If you place a pickup order and wish to pay a deposit and the rest upon pickup, the minimal order for a deposit is $3000.00. You can send us a reply in the order confirmation email with a screenshot of the remittance. We will send you invoices and notice to pickup when the order is ready.
We will send you an acknowledgment of the successful completion of an order on the site. This email will contain the details of the order that you have placed and will give you an order number. We would advise you to keep this email safe as you will need your order number for any further queries. Failure to provide us with an order number on request will result in a delay with your inquiry, as we will have to search by name or contact number. Once your order has been accepted and dispatched to you we will send you a shipment confirmation email, in which the tracking number and a link to the website to track the delivery will be provided. It is highly recommended that you leave us your mobile number so it will be provided to the courier to arrange delivery/redelivery if you are not available to receive the order.
Please contact us if you do not receive an acknowledgment email and we will make sure it is not a problem with our system. Acknowledgement emails are generated and sent automatically once an order has been successfully completed.
You may need to check your email rules as it may be treating our emails as spam or junk mail and you should check your spam or junk mail folders to make sure they have not gone directly to this location.
You may also need to ensure that all of the details entered are correct, please pay particular attention to your payment card details, email address and delivery addresses.
All items are subject to availability. Generally, if an item is showing on our website then it is available to order. However, during busy periods we may be in a position where we cannot supply an item or there may be an unexpected delay in despatch. Our system does not record individual size quantities, if you order several items in the same size you may experience a slight delay. If this is the case, we will let you know as soon as possible and will offer to substitute the item for another item of a similar style/colour/ size or we will offer a refund.
We endeavour to process orders as quickly as possible as we know sometimes you need the order urgently. However please allow 24 – 48 working hours as a guide for us to process the order and start fabrication. Also during the ordering stages, there is a question for you to enter the pickup and delivery preferred date. Please note it is for indicative purposes only, we will try to meet your request but it is not guaranteed. If you urgently need the order, you can ring or email us with the order number once the order is placed. We will put an urgent notice on the order and process it as soon as possible.
Please do not come to our factory to pickup the order unless you receive the email confirmation that the order is ready to go.
It will costs around $28-$35, to most of metro areas in Australia. If you are in rural area, we can do the free shipping if you choose flatpack products.
It will costs around $128-$135, to most of metro areas in Australia. If you are in rural area, we can do the free shipping if you choose flatpack products.
Yes. All our freeshipping products are here. These are our flatpack products. You will need to assemble them upon receiving the delivery. We will pack all the materials, mesh, accessories in the package. The product will be fabricated and labeled accordingly to your customization. If you have any questions, feel free to contact us.
Yes. You can select free pickup upon placing the order. We will make the order and send you a notice when it is ready for pickup. Please do not come to our factory if you have not received the notice.
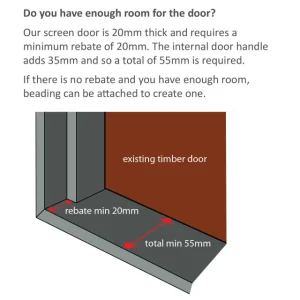
No. All the doors are made with the panels only. If you need door jambs or beading. You can select it in the addon section. The door will required at least 22mm recess in the door jamb for housing. If your existing door jamb does not have the room or it is off square, like the top and bottom are off by more than 15mm, you will achieve a better installation with our frame adaptor.
Yes. Please send us an email by replying to the order confirmation order if you need the same key for all the doors.
We have two flyscreen frame, 9mm and 11mm. Depending on your recess width, you can choose different frames. Please use a solid ruler measure the width of your recess.
Security window screen only has 11mm frame. If your recess is less than 11mm wide, you can only install with the face-fixed method.
You can are not sure how to measure the screen size, you can always upload photos of your windows upon placing the order. Ensure you show the recess, window frames, and the area where the screen is placed. (multiple photos are welcome.)
1. Measuring the existing screen:
In the event that you want to replace existing screens, the most effortless approach is to measure your old ones, please make sure that you measure the recess width and pick the right frame.
Note: Do not measure the width from the middle of the flyscreen, in case that it is bowed.
Screen Width: Measure from the outer edge of the frame top and bottom, record the smallest measurements. Note: There ought to max 5 mm variation in the two lengths, if the variation is more. You need to get in touch with us to discuss 02 8385 4553.
Screen Height: Measure the height left and right, record the smallest measurements.
Recess Width: Using a solid ruler measure the width of the recess.
2. Measuring for a face-fixed screen:
Note: You will need to fit the screen to the face of the windows and then drill through the frame of the window surround and screw or rivet in place.
Screen Width: Measure the recess length top and bottom, record the smallest measurement.
Screen Height: Measure the height left and right, record the smallest measurement.
3. Measuring for a recess fitting screen:
Screen Width: Measure inside opening of windows where the screen will be placed, from point A to point B as the diagram demonstrated below. Please deduct 2-3 mm to permit an easy fitting and record the littlest measurements.
Screen Height: Measure inside opening of windows where the screen will be placed, left and right. Please deduct 2-3 mm to permit an easy fitting and record the littlest measurements.
Recess Width: Using a solid ruler measure the width of your recess, choose from the 9mm and 11mm frames.
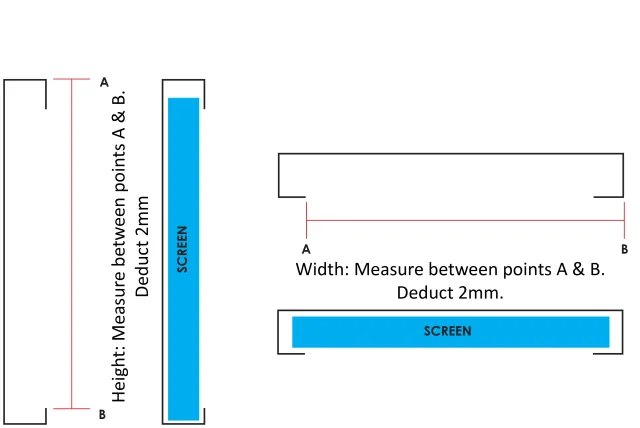
MEASURE POINTS

ALLOWANCE CHECK
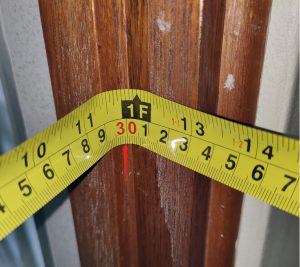
READ OFF A BENT TAPE
To read off a bent tape, we generally recommend to read it just before the bend, like showing in the photo below. The tip is to place the bend against the corner as tightly as possible. If you place the bend at the corner and you read the number right before the bend, you can add 1~2 mm to the read, and that would be your measured opening. In this case, 301mm is pretty accurate. Measure twice or three times until you get the same number. 1 or 2mm off will not really impact the installation of the screens as they are many ways to pack or chisel the opening to make it fit.
MEASURING WITH THE TAPE LENGTH
Alternatively, you can place the tape meaure inside the opening and include the tape body as part of the measurement. You need add the tape body length to the measurement to get the final read. Most of the tape will have its own body length indicated on the case, else you can measure the body length first.
METHOD
1. Measuring for a new screen door, build from scratch:
Door Height: Measure from top (1.1) to bottom (1.2) on both sides of your door frame,record the shortest measurement and entered the number in the text field named opening height. The new door height will be automatically generated based on the measurement you entered.
Note: A bug seal is recommended to minimise gap at the bottom after the door is installed. This can be selected from the list of Add Ons available when calculating the price of your door.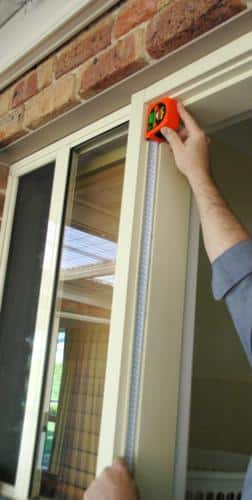
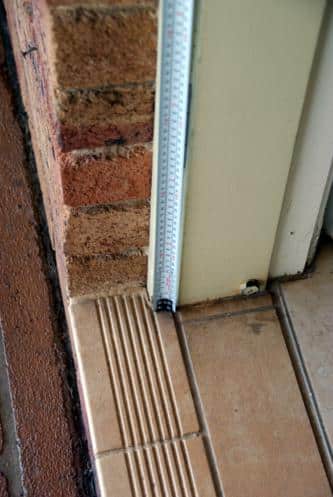
1.1 1.2
Door Width: Measure the top, middle and bottom of your door opening/rebate(1.3), record and enter the number iinto the according text field. We recommend measure at least twice and check the measurements before entering into our system.
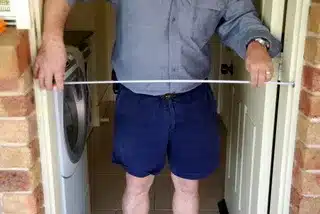
1.3
Hinge Bind: If your middle width is longer or shorter, creating a bow in or out at the middle, this must be corrected. For a bow in the centre, the hinge can be packed out (Hinge Packers are available on the addon page). For a bow out, the hinge will have to be let in, this must be done by chiselling the door frame to make a cutout to place the hinge.
Lock Side: Stand outside, and close the main door. Establish whether you want the new lock on the left or right hand side, then decide if you want the new lock above the existing door handle or below.
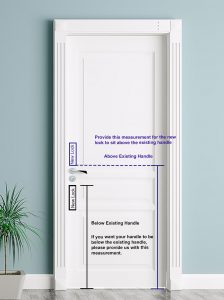
Lock Above: Measure from the bottom sill to the top of the existing solid door lock or handle.(1.4)
Lock Below: Measure from the bottom sill to the bottom of the existing solid door lock or handle.(1.4)
If you have an existing lock hole (1.6) from a previous door and you are confident that this has clearance from the existing lock, based on the Lock Above & Lock Below guidelines, then measure from bottom floor to the centre of the lock hole. This would be the striker/ lock tongue height. You need to send us this measurement as a reply to the order confirmation email if you want us to install the lock to this measurement. We cannot guarantee a perfect fit in this situation and you may need to expand the holes still.
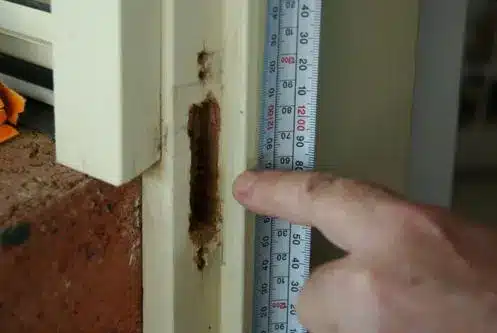
1.6
Lock Type:
Security sliding door will require steel key lock for security purpose. Flyscreens can have key lock, handle with a latch, or just handle, since security is not a concern for flyscreen doors.
2.Replacing the existing door:
Door Height & Door Width: We generally recommend you to measure the size of the existing doors, if you are happy with how the door is. The new door will be exactly the same. If you are not happy about the size, you need to follow the above step and choose build from scratch.
strong>Lock Height:
Lock Above: Measure from the bottom of the exisitng door to the bottom of the exisitng lock and enter the number. the new lock will be installed above this point.
Lock Below: Measure from the bottom of the exisitng door to the top of the exisitng lock and enter the number. the new lock will be installed below this point.
Lock Side:
Viewing from outside the house, identify which side the original door lock is.
Lock Type:
Security hinge door will require key lock, flyscreen door can choose any type that best fit your needs.
TRACKS
Our security doors have top and bottom rollers. Flyscreens have bottom rollers only. Your bottom track must have a rig/guide at the center so the rollers can run without fall off. If not, you need to purchase tracks set from us to accommodate the rollers.
METHOD
1. Measuring for a new screen door:
Door Height: Measure lengths at three to four points along the track; each time, take measurement from the top/inside of the top track, to the top/exterior of the bottom track, record the numbers and enter the shortest number to the corresponding height text fields. The door size will be auto calculated and recorded to our system.
There are two track systems widely adopted in Australia, one called U shape bottom track and one called open button track; illustrated as below:
Situation 1. U shape bottom track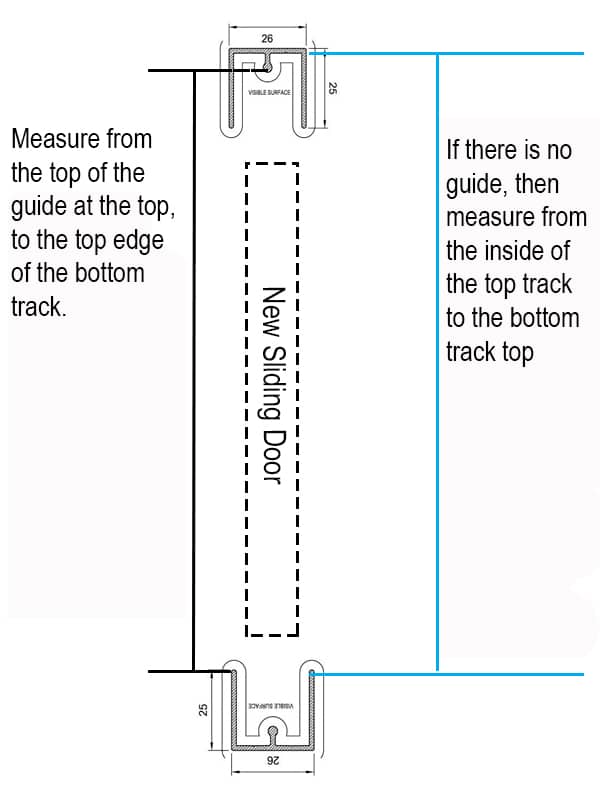
Situation 2. Open bottom track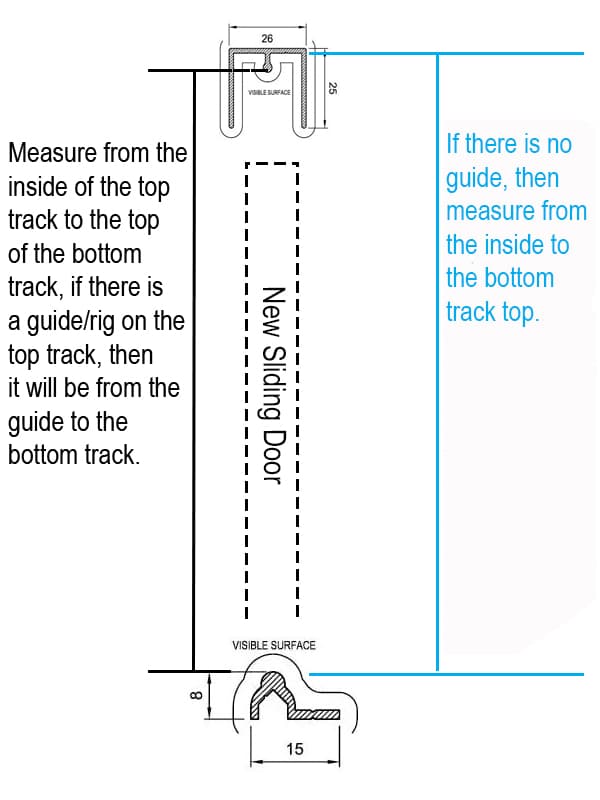
After you measured the height of different location, please check if the numbers are the same. If a variation of more than 4 mm, it means the tracks are not leveled. Some additional adjustment may be required during installation, still enter the smallest height and contact us if encounter any issues during the installation.
Door Width:
The screen door width in general is the same as the sliding glass panel width.
Single Sliding Panels:
Please measure the width of the sliding glass panel and use its width, from the edge of the aluminium frame on one side to the edge of the frame on the other side as the opening width and enter the number into the width field..
Please measure the width three times, top, middle and bottom and record the number in each field.
Stacker Doors/ Multiple Panel doors:
Please measure the width of each sliding glass panel, from exterior edge to the other edge, and record three measurements and enter the numbers into the corresponding width fields.
Information About Interlocks
Frame Interlocks are supplied with all Sliding Security Screen Doors; flyscreen doors are supplied with a side bug seal.
The purpose of interlocks is to lock the back of the sliding door into the fixed panel simultaneously as the door is closed into the locking position, this ensures that the door is locked on both sides, see illustration below.
A frame interlock is fixed to the back of the sliding door at the point of installation so as to have it interlock with thereceiving interlock which is located on the fixed glass panel.
As illustrated in the diagram above, the purpose of the interlock of the screen is to lock in to the receiving interlock on the glass door. However not all glass door has receiving interlock installed.
No Receiving Interlock?
There are two solutions:
Need to install Receiving Interlocks?
If your doors do not have receiving interlocks on the fixed glass panel and it is necessary for you to install them there are three different sizes receiving interlocks:
Identifying precisely which receiving interlock is most suitable to your doors can be using the following methods:
The illustration bellow shows where to measure.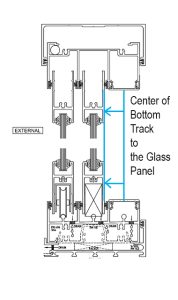
If the distance from the centre of the bottom track to the face edge of the fixed glass panel is greater than 20 mm then a 7 mm offset interlock is required.
If the distance from the centre of the bottom track to the face edge of the fixed glass panel is less than 20 mm and greater than 16 mm then a 5 mm offset interlock is required.
Lock Height:
Lock Above: Measure from the top of the bottom track to the top of the existing sliding door lock or handle, and record the number.
Lock Below: Measure from the top of the bottom track to the bottom of the existing sliding door lock or handle, and record the number.
Lock Side:
Viewing from outside, identify which side the glass door handle is located.
Lock Type:
Security sliding door will require steel key lock for security purpose. Flyscreens can have key lock, plastic latch, or handle, since security is not a concern for flyscreen doors.
2.Replacing the existing door:
Door Height & Door Width: We generally recommend you to measure the size of the existing doors, if you are happy with how the door is. The new door will be exactly the same. If you are not happy about the size, you need to follow the above step and choose build from scratch.
Lock Height:
Lock Above: Measure from the bottom of the exisitng door to the bottom of the exisitng lock and enter the number. the new lock will be installed above this point.
Lock Below: Measure from the bottom of the exisitng door to the top of the exisitng lock and enter the number. the new lock will be installed below this point.
Lock Side:
Viewing from outside the house, identify which side the original door lock is.
Lock Type:
Security sliding door will require key lock, flyscreen door can choose any type that best fit your needs.